Generating a request for a subsequent certificate
Software requirements
The computer on which the certificate request will be generated must meet the following requirements:
- An operating system installed and running :
Windows 10
Windows 11
MacOS - supported browsers are:
Microsoft Edge
Chrome
Firefox
Opera - Javascript scripting support enabled in the browser, support for storing cookies
- I.CA PKIServicehost component and extension installed
- I.CA SecureStore Card Manager (only in case of generating a request for a smart card)
The process of generating a request for a subsequent certificate
The process of generating a subsequent certificate request is divided into several steps:
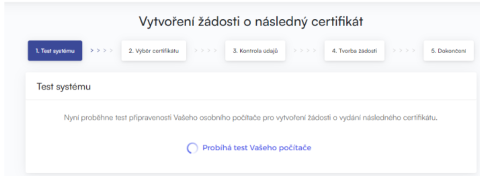
- System Test
- Certificate selection
- Check the data
- Creation of the request
- Completion
Checking software equipment
To help you check your computer is ready to generate a request, a check page is displayed when you start generating the request to verify that key software components are present.
In the absence of the component and the I.CA PKIServiceHost extension, an error message appears, see below
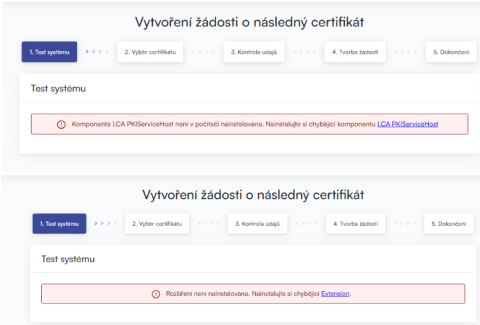
Click on the highlighted I.CA PKIServiceHost and Extension to download and then install the necessary components for generating the application on the PC. After successful installation, restart the browser.
The page will test the computer, if no problems are detected, proceed to the actual generation of the subsequent certificate request.
If an error is detected during the check, you cannot proceed with the generation of the subsequent certificate request. First you need to fix the error that prevents the creation of the certificate request. The meaning of the error messages is given in the following sections.
- Unsupported operating system
You must use one of the operating systems listed above to generate a request. - Unsupported Internet browser
You must use one of the browser versions listed above to generate the request. - JavaScript support
The pages used to generate the certificate request require JavaScript scripting support. Should this check fail, it most likely means that scripting support is disabled in the browser settings. Enable JavaScript scripting support in your browser. - I.CA PKIService Host
Sites require the I.CA PKIService Host component installed to function. Make sure you have it installed. You must restart your browser after installation. - I.CA PKIService Host extension (add-on)
You must also have the extension installed and enabled in your browser. Clicking on the highlighted name of the Extension will redirect you to the settings where you can find and install the extension, after installation it is necessary to refresh the page. - Storing cookies
In order for the application generation pages to work properly, your browser must allow the page to store cookies. If you have disabled the storage of cookies, enable them.
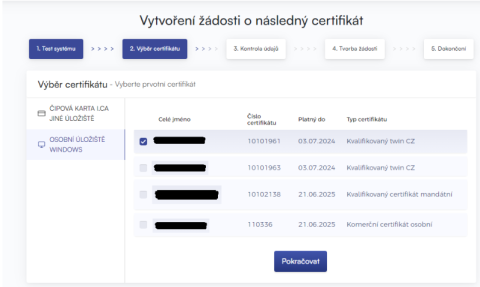
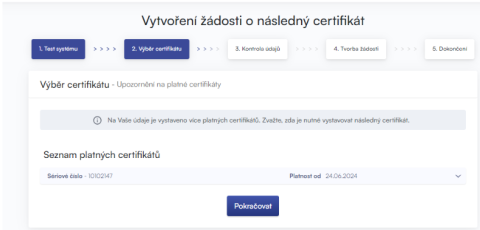
Selecting a certificate to create a request for a subsequent certificate
If the scanning process was error-free, the page displays a form where you select a valid certificate for which you want to issue a subsequent certificate.
If your certificate is stored in the Windows certificate store, leave the Personal Windows Certificate Store selected. If your certificate is on an I.CA smart card, select I.CA smart card (Other storage).
If the certificate is stored in the MACOS storage, select the MACOS keychain option.
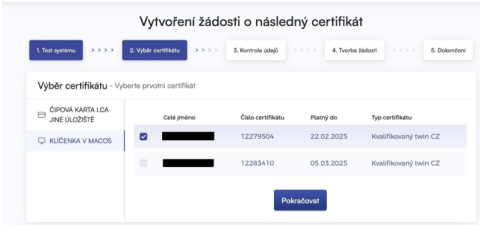
Depending on your previous selection, you are offered a list of certificates for which a subsequent certificate can be issued. If you selected the I.CA Chip Card option, you must have a reader connected and a chip card inserted.
You can only issue a follow-up certificate for certificates that have not expired and are not on the CRL (Certificate Revocation List)!
If you receive an email notifying you that your certificate has expired, the email contains a URL where you can create a request for a follow-up certificate. The URL also includes the serial number of the certificate.
If you enter this URL in your browser, the certificate is automatically selected.
Data control
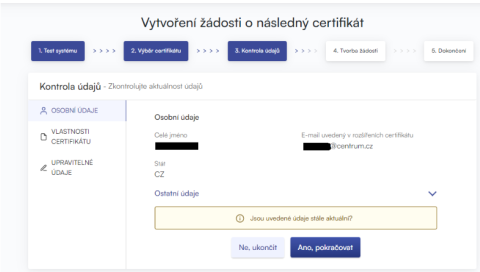
If the entries in the certificate are up to date, continue by clicking "YES, continue" to start generating the certificate request. You can view more detailed data by expanding the "Other Data" option.
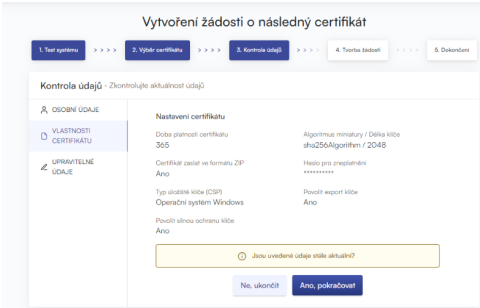
The "CERTIFICATE PROPERTIES" section displays the settings of the existing certificate, such as the certificate serial number or storage type.
If any of the items in the certificate have changed, continue by clicking "Editable Data" and proceed to the section on Adding and Changing Some Data.
Addition and amendment of certain data
In the "EDITABLE DATA" section, you can affect some of the data that will be included in your subsequent certificate.
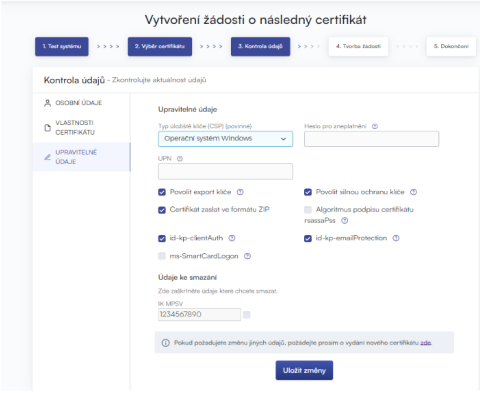
Password for invalidation:
If during the use of the certificate the private key is compromised, the data is changed (change of name, residence...) or there are other reasons why the certificate should no longer be used, it is necessary to invalidate the certificate.
The certificate can be invalidated via the web interface. When invalidating the certificate, you will be asked to enter the password for invalidation.
If you do not enter a password, the password set for the existing certificate will be used as the password to invalidate the certificate.
If you choose to enter a different password, it must be between 4 and 32 characters long. Only upper and lower case letters without diacritics and numbers are allowed.
Key store type (CSP):
For Key Store Type (CSP), select the Cryptographic Service Provider (CSP) module from the menu that will generate your private key. All of the CSPs shown here are installed on your computer.
Exporting your private key:
If your chosen key store type (CSP) supports private key export, you are offered the option to enable private key export. This option allows you to export the certificate including the private key. This will allow you to transfer the private key between repositories. Key management requires extra care in this case due to the higher risk of key theft/misuse.
Strong private key protection:
If your chosen key store type (CSP) supports strong private key protection, you are offered the option to enable strong private key protection. Before each use of your key, you will be notified that your key is being used.
You then have the option to choose between:
Medium - you will only ever be notified with an informative message.
Strong - you will be asked to enter your password before each use
Edit Email:
If an email is included in an existing certificate, you have the option here to remove it from subsequent certificates. In most cases it is not possible to change it, in this case please request a new certificate with the corrected details.
Unauthorized certificate content:
In some exceptional cases, your certificate may contain extended key usages and alternate subject names that may no longer be present in the certificate according to the certificate policy.
In this case, a warning is displayed and you must remove these extensions before proceeding.
Generating a certificate request
The following procedure varies slightly for each type of key store (CSP):
I.CA Smart Card Key Storage\ I.CA SecureStore PKCS11# Library
If you select Microsoft Smart Card Key Storage as the key storage type when filling in the applicant details, the procedure for generating the request is as follows:
First, you will see the following dialog. At this point, your private key is generated. It may take several tens of seconds to generate the private key.Image
After the private key is created, you are prompted to enter the PIN for your card.Image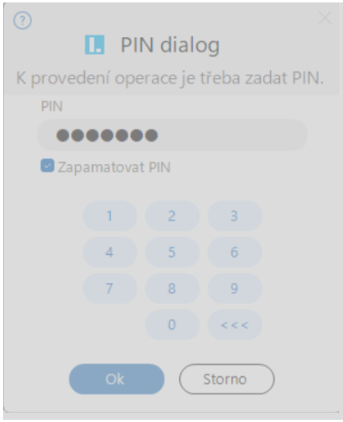
The I.CA smart card can also use the Microsoft Base Smart Card Crypto Provider storage type.
In the case of creating an application on macOS, the storage chosen is the I.CA SecureStore PKCS11# Library.Microsoft Enhanced RSA and AES Cryptographic Provider (Windows operating system) with strong private key protection
If you select Microsoft Enhanced RSA and AES Cryptographic Provider (or Microsoft Enhanced RSA and AES Cryptographic Provider /prototype/) as the key store type when you fill in the requestor information and check the Enable strong key protection option, the procedure for generating the request is as follows:Image
If you click Set Security Level, you will be able to change the security level.Image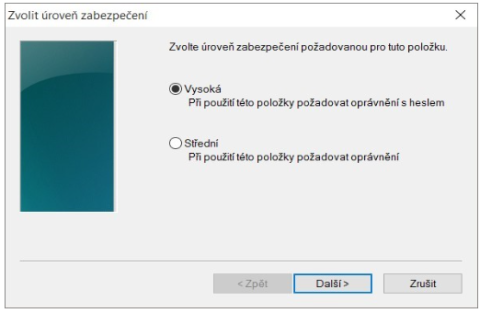
If you select a high security level, you will be prompted for a password. (You will need to enter this password whenever you use your issued certificate).Image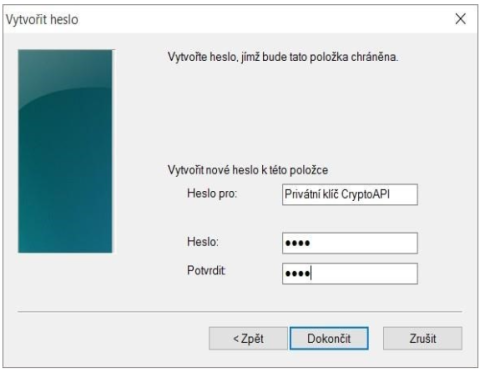
When you click Finish, the security level will be changed. Now click OK.
In the next dialog box, grant permissions by clicking Allow. If you have selected a high security level, you must also enter a password.Image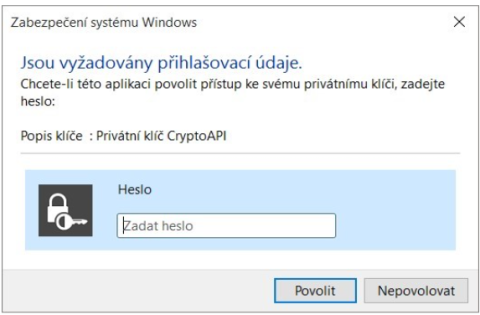
MacOS File-Based Keychain
If we are creating a request on macOS for a certificate that is stored on the computer, the storage type selected will be MacOS File-Based Keychain. When generating a key for the keychain, you will be asked to enter the password for the keychain. If it is not desirable to require a password each time the certificate is used, the option to always allow can be selected.Image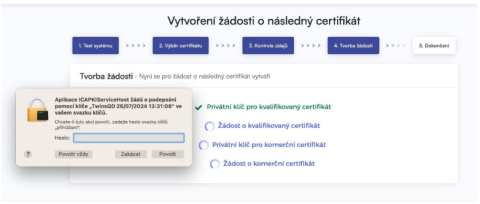
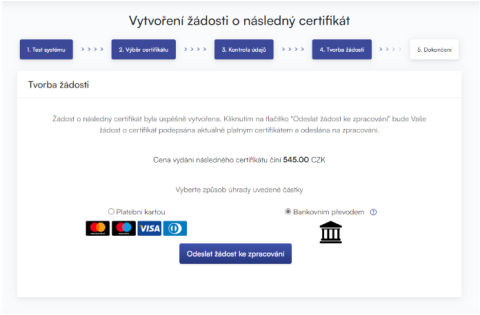
Signing and submitting a request for a subsequent certificate
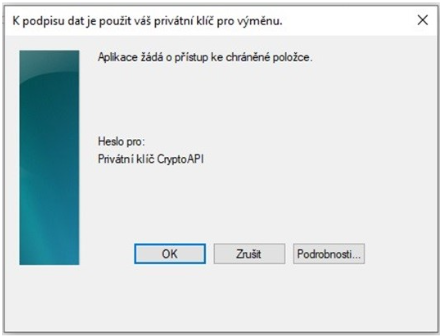
When you click the Submit Request for Processing button, a dialog containing your request for a follow-up certificate will appear. This request must be signed with the certificate for which you are requesting a subsequent certificate.
The request must be signed by clicking on the "OK" button.
If the request is generated for a smart card, you need to sign it by entering the PIN code of the smart card.
If you are requesting a TWINS follow-on certificate, you need to sign both the request for the follow-on qualified certificate and the request for the commercial certificate.
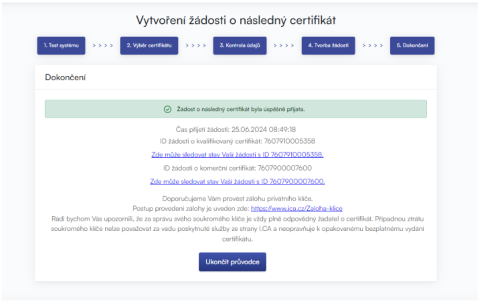
After successfully submitting the request, you will see the following page:
Troubleshooting
If an error occurs during the application generation process, you will be informed by an error message.
Some errors may be of a more serious technical nature. They may be related to the state of your computer's hardware or software. In this case, we recommend contacting I.CA Technical Support.