Setting up and using a timestamp in Adobe
How to do it?
Instructions for using the timestamp.
Setting a time stamp
Menu > Preferences > Signatures > Add a timestamp to a document > More...
In the "Server Settings" dialog box under "Time Stamp Servers" , select "New" at the top .
In the "New Timestamp Server" dialog box, we are already entering the supplied information for timestamp subscription. See below for an example. In case you have received a username and password the option "This server requires login" is selected . In case of certificate authentication, only the server URL is filled in.
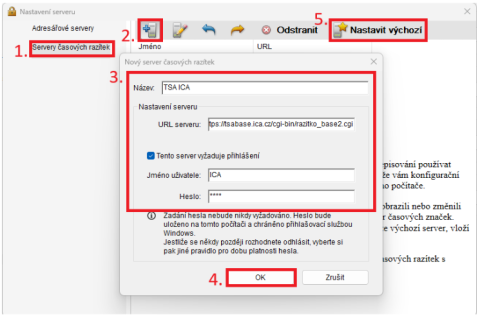
After clicking OK, the timestamp server is already set up. The last step is to specify the server as the default.
Note: In the case where the server is set as default, the timestamps will be added automatically every time you sign. However, in order to add a stamp to the document, the server needs to be set as default as Adobe requires it. So if you only want to add a stamp for certain signatures, you will always need to add and remove the default server setting in the settings. Remove the default timestamp settings in the same place as the timestamp server settings(Edit > Preferences > Signatures > Add a timestamp to a document > More...) by selecting "Clear" which will appear instead of the "Set as default" button .
Add a timestamp to a document
All tools > See more > Use certificate > Timestamp
When you click on the "Time Stamp" button, you will be presented with a window for selecting where to save the stamped document. You can rename the document or leave the name the same, in which case the document will be overwritten.
Note: If you are going to perform a signature, the stamp will be added along with the signature if the server is set as default. If a server is not set as default, then Adobe will display a window when you add the stamp, where you need to set the default server.